Dear tech support team,
I’m sorry if this isn’t the right place to post, as this is my first time on the forum. I need help with my Whonix VDI disk, which keeps growing on my Windows 11 host after each system update. I’ve searched but haven’t found a reliable solution for my setup, especially since my Whonix setup uses an ext4 filesystem and a HDD drive.
The main issue is reclaiming space after file deletions. I understand that the free space inside the VM needs to be zero-filled so VirtualBox can compact the VDI file. The recommended tool for ext4 is zerofree, which requires booting into Live Mode (SYSMAINT) to mount the filesystem as read-only.
However, I’m concerned about the risks. There are reports that zerofree may not fully support advanced ext4 features and could potentially corrupt the filesystem, even when used correctly.
Given these risks and the lack of a safe, straightforward method for Windows hosts, I would greatly appreciate guidance on how to proceed safely or alternative risk free strategies to prevent the VDI from continuously growing. Is there a way to safely zero-fill the disk or use TRIM effectively in this environment so that I can reclaim space for the host OS?
Thank you.
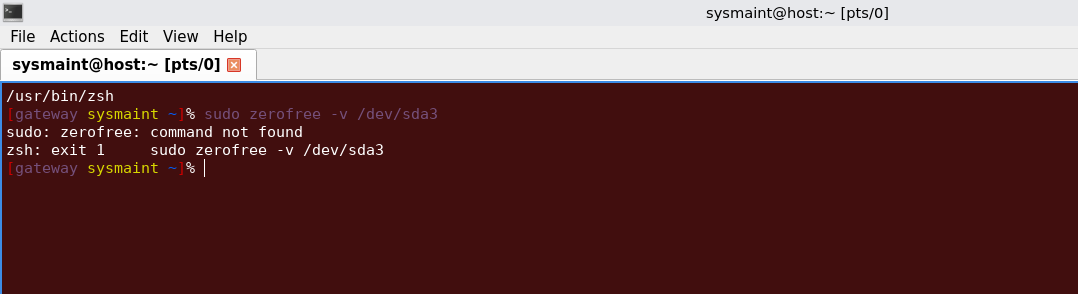
edit1: After trying to get zerofree I got this error “package zerofree is not available but is referred to by another package this may mean that the package is missing for has been obsoleted or is only available from another source. Error: package “zerofree” has no installation candidate zsh: exit 100 sudo apt install zerofree“
edit2: Not quite sure what to do now since zerofree won’t install after typing “sudo apt install zerofree“. Could not find any solution online on how to install zerofree without the error message. I guess the vdi is going to just keep growing untill it eats up the host space…..
Try to install any package whatsoever first for testing purposes. Not zerofree. Another package. To confirm the system isn’t severely broken. As per: Package Installation from Debian Package Sources
I noticed that after trying to install a different package it also said the same thing, not sure why. So I decided to freshly install everything and deleted the old vdi. After doing that I was finally able to install zerofree. Now the next step is learning how to use it safely. I heard it has to be used in “recovery mode“ or am I confusing it with “live systmaint” and using the terms interchangeably?
After running zerofree in live systmaint mode by typing “sudo zerofree -v /dev/sda3“ I got this error saying “zerofree: failed to open filesystem /dev/sda3“
I think this is probably specific to Whonix, because we set bdev_allow_write_mounted=0 on the kernel command line. That will have to be removed before zeroing free space on a mounted (even if read-only) filesystem will work, I believe.
Would I have to type this command bdev_allow_write_mounted=0 whilst in live system maintenance mode before typing “sudo zerofree -v /dev/sda3“? Or are there any other inbetween steps that I must have missed? Also sorry for the late reply, as the forum was locked for 5 days.
The bdev_allow_write_mounted=0 snippet is part of the kernel command line, meaning that it’s a setting the core of the OS interprets at boot time. The best way to remove the option is to use these instructions:
Specifically, you would want to boot into PERSISTENT Mode | SYSMAINT Session, and then write the following contents into a new file at /etc/default/grub.d/50_user.cfg:
(Note that I just edited the linked documentation to include instructions on removing kernel parameters using this method.)
Once the settings are set, run update-grub, make sure you don’t get any error messages, then reboot. (Note that messing with boot options is always dangerous, so you might want to snapshot your VM before you do this.)
And is this command above universal for all users or are there specific variations for each system? Also, once I run the one-liner, is there anything else I need to do before zerofree will work properly?
I’d really appreciate any guidance you can share thank you so much for your help.
edit: oops, not sure why my message became colour coded like that…..
That line of code is not a command that you run in a shell. It is a line of code that is meant to be pasted into a text file using a text editor. The documentation link above suggests using sudoedit for this.
If you paste the line of text you suggested into the /etc/default/grub.d/50_user.cfg text file, it will insert the filename into the kernel command line itself.
To illustrate, this is sort of what the kernel command line currently looks like:
linux param1 param2 ... bdev_allow_write_mounted=0 paramY paramZ
This is what you want it to look like:
linux param1 param2 ... paramY paramZ
This is what it will end up looking like if you use the code you suggested:
linux param1 param2 ... /etc/default/grub.d/50_user.cfg paramY paramZ
The documentation link should list all of the steps needed to remove the kernel parameter. It’s highly recommended to read through it carefully.
The only thing i’m now worried about is pasting the command above since it uses this symbol “|“ and there is no way of typing it in PERSISTENT Mode | SYSMAINT Session?
The steps I took was first typing “sudoedit /etc/default/grub.d/50_user.cfg” in the terminal, then a notepad thingy appeared. In the notepad popup I typed “GRUB_CMDLINE_LINUX=”$(echo “$GRUB_CMDLINE_LINUX” | str_replace “bdev_allow_write_mounted=0” “”)"
Then I pressed save. After that I typed into the terminal “sudo update-grub” and rebooted. Then I ran the zerofree command and still got the zsh error.
An easy linux distro like Zorin looks like Windows and is more private. You can then easily run whonix in virt-manager and then just select discard mode: unmap and also run “sudo fstrim -av” inside a terminal in whonix-workstation.
It’s really questionable as to what exactly in in Windows since it’s closed source software. Linux is easy and fun and these days especially has fewer code problems than windows. Make sure to install TimeShift to restore your linux system to an earlier time if things have problems and it should be a smooth experience.