6.0 FIRST STEPS IN NON-QUBES-WHONIX
6.1 Launch and Connection
6.1.1 Start Whonix in KVM
If you know Virtual Machine Manager, there is nothing special about starting Whonix VMs compared to starting other VMs. First start Whonix-Gateway, followed by Whonix-Workstation.
Using the Graphical User Interface, start the Virtual Machine Manager:
Start Menu → Applications → System → Virtual Machine Manager
Then, start the Whonix-Gateway:
Click on Whonix-Gateway → click open → click the play symbol
Repeat these steps for Whonix-Workstation.
If you prefer the command line interface, run:
virsh -c qemu:///system start Whonix-Gateway
To start Whonix-gateway. Then run:
virsh -c qemu:///system start Whonix-Workstation
To start the Whonix-Workstation.
Note: If you want to adjust the display resolution seamlessly to match your host screen size after starting, do the following:
Virt-Manager Whonix-Workstation window → View → Scale Display → Always | Check: Auto resize VM with window
If you later decide to remove the Whonix KVM VMs, Whonix network and images, follow the ‘Uninstall’ instructions in this link:
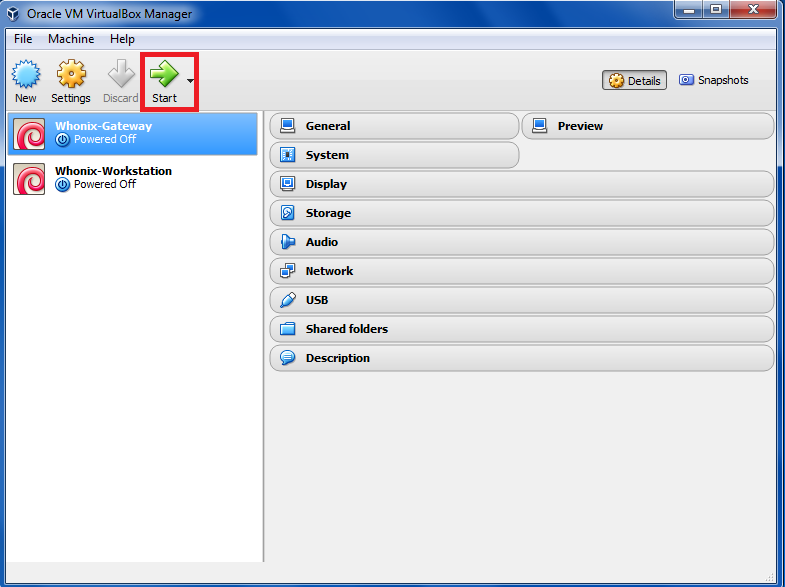
6.1.2 Start Whonix in VirtualBox
Starting Whonix is simple: either double click on the Whonix-Gateway and Whonix-Workstation, or highlight each selection in turn and press ‘Start’.
Figure 27: Start Whonix in VirtualBox
6.2 Change Passwords
On the first run of Whonix, you should immediately change the passwords on BOTH the Whonix-Gateway and Whonix-Workstation (this step is not relevant for Qubes-Whonix users).
The passwords for both the account, user user and user root, must be changed. By default, the password is changeme.
Open a terminal:
Start menu → Applications → System → Terminal.
Login as root:
sudo su
Change root and user password:
passwd
passwd user
and follow the instructions.
Note: Consider using diceware passphrases for better security. Diceware passphrases of 6-7 words in length cannot be feasibly brute-forced within your lifetime using standard (non-quantum) computers.
http://world.std.com/~reinhold/diceware.html
6.3 Run Whonixcheck (Optional)
By default, Whonixcheck runs automatically from time to time whenever the user starts up a Whonix-Workstation. Whonixcheck’s purpose is to verify that the Whonix system is up-to-date and that everything is in proper working order. You may want to manually run Whonixcheck before updating your system. It usually takes a few minutes to run.
If you are using a graphical Whonix environment, complete the following step:
Start Menu → System → whonixcheck
If you are using a terminal-only Whonix environment, complete the following step:
whonixcheck
If everything is functioning properly, the output should show each heading “INFO” in green (not red). For example:
INFO: SocksPort Test Result: Connected to Tor. IP: 146.10.104.240
INFO: TransPort Test Result: Connected to Tor. IP: 91.89.96.88
INFO: Stream Isolation Test Result: Functional.
INFO: Whonix News Result:
√ Up to date: whonix-workstation-packages-dependencies 2.5-1
√ Up to date: Whonix Build Version: 11.0.0.3.0
INFO: Debian Package Update Check Result: No updates found via apt-get.
INFO: Whonix APT Repository: Enabled. When the Whonix team releases JESSIE updates, they will be AUTOMATICALLY installed (when you run apt-get dist-upgrade) along with updated packages from the Debian team. Please read Placing Trust in Whonix to understand the risk. If you want to change this, use:
Start menu → Applications → System → Whonix Repository
INFO: Tor Browser Update Check Result: Up to date.
INFO: Please consider making a small reoccurring donation. See: Donating to Whonix
6.4 Update Whonix
It is critical that the Whonix-Gateway and Whonix-Workstation VMs stay updated! Unpatched software is one of the most common attack vectors identified in research.
a) Update your package lists.
The following steps (updating and upgrading) should be applied in both the Whonix-Gateway and Whonix-Workstation terminals and repeated at least daily thereafter.
sudo apt-get update
The output should look similar to this:
Hit http://security.debian.org jessie/updates/Release.gpg
Hit http://security.debian.org jessie/updates/Release
Hit http://deb.torproject.org jessie Release.gpg
Hit http://ftp.us.debian.org jessie Release.gpg
Hit http://security.debian.org jessie/updates/main i386 Packages
Hit http://deb.torproject.org jessie Release
Hit http://security.debian.org jessie/updates/contrib i386 Packages
Hit http://ftp.us.debian.org jessie Release
Hit http://security.debian.org jessie/updates/non-free i386 Packages
Hit http://deb.torproject.org jessie/main i386 Packages
Hit http://security.debian.org jessie/updates/contrib Translation-en
Hit http://ftp.us.debian.org jessie/main i386 Packages
Hit http://security.debian.org jessie/updates/main Translation-en
Hit http://ftp.us.debian.org jessie/contrib i386 Packages
Hit http://security.debian.org jessie/updates/non-free Translation-en
Hit http://ftp.us.debian.org jessie/non-free i386 Packages
Ign http://ftp.us.debian.org jessie/contrib Translation-en
Ign http://ftp.us.debian.org jessie/main Translation-en
Ign http://ftp.us.debian.org jessie/non-free Translation-en
Ign http://deb.torproject.org jessie/main Translation-en_US
Ign http://deb.torproject.org jessie/main Translation-en
Reading package lists… Done
If you see something like this:
W: Failed to fetch http://ftp.us.debian.org/debian/dist/jessie/contrib/binary-i386/Packages 404 Not Found
W: Failed to fetch http://ftp.us.debian.org/debian/dist/jessie/non-free/binary-i386/Packages 404 Not Found
E: Some index files failed to download. They have been ignored, or old ones used instead.
Err http://ftp.us.debian.org jessie Release.gpg
Could not resolve ‘ftp.us.debian.org’
Err http://deb.torproject.org jessie Release.gpg
Could not resolve ‘deb.torproject.org’
Err http://security.debian.org jessie/updates Release.gpg
Could not resolve ‘security.debian.org’
Reading package lists… Done
W: Failed to fetch http://security.debian.org/dists/jessie/updates/Release.gpg Could not resolve ‘security.debian.org’
W: Failed to fetch http://ftp.us.debian.org/debian/dists/jessie/Release.gpg Could not resolve ‘ftp.us.debian.org’
W: Failed to fetch http://deb.torproject.org/torproject.org/dists/jessie/Release.gpg Could not resolve ‘deb.torproject.org’
W: Some index files failed to download. They have been ignored, or old ones used instead.
Then something went wrong. It could be a temporary Tor exit relay or server failure that should remedy itself. Usually changing your Tor circuit and trying again is successful. If that fails, running whonixcheck can help to diagnose the problem.
If you see an error message like:
Could not resolve ‘security.debian.org’
It helps to run:
nslookup security.debian.org
And then try updating your package lists again.
b) Upgrade Whonix.
In konsole, run:
sudo apt-get dist-upgrade
Note: At first Whonix boot, you are asked if you want to enable or disable Whonix’s apt repository. If you disabled the Whonix APT Repository, then you will have to manually check for new Whonix releases and manually install them from source code:
6.5 Update (Upgrade) Precautions
a) Never install unsigned packages!
If you see output like the following:
WARNING: The following packages cannot be authenticated!
icedove
Install these packages without verification [y/N]?
Then don’t proceed! Press N and Enter.
Running apt-get update again should fix the problem. If not, then something is broken or it may be a man-in-the-middle attack. This possibility isn’t that unlikely, since we are updating over Tor exit relays and some of them are malicious. Change your Tor circuit and then try again.
b) Do not ignore signature verification warnings.
There should be none at the moment. If there is such a warning, the output will look like this:
W: A error occurred during the signature verification. The repository is not updated and the previous index files will be used. GPG error: http://deb.torproject.org stable Release: The following signatures were invalid: KEYEXPIRED 1409325681 KEYEXPIRED 1409325681 KEYEXPIRED 1409325681 KEYEXPIRED 1409325681
In that case, you should be careful even though apt-get will automatically ignore repositories with expired keys or signatures, meaning you will not receive upgrades from that repository. Unless the issue is already known or documented, it should be reported so it can be further investigated.
There are two possible reasons for why this could happen. Either you are a victim of a man-in-the-middle attack, or there is an issue with the repository that the maintainers have to fix. The former is not a big issue, either it will automatically resolve after a period of time or you can change your Tor circuit and try again.
If you experience other signature verification errors, these should be reported, but they are unlikely at this time.
c) Be cautious of changed configuration files.
If you see output like the following:
Setting up ifupdown …
Configuration file `/etc/network/interfaces’
==> Modified (by you or by a script) since installation.
==> Package distributor has shipped an updated version.
What would you like to do about it ? Your options are:
Y or I : install the package maintainer’s version
N or O : keep your currently-installed version
D : show the differences between the versions
Z : background this process to examine the situation
The default action is to keep your current version.
*** interfaces (Y/I/N/O/D/Z) [default=N] ? N
Then be careful. If the updated file isn’t coming from a Whonix specific package (some are called whonix-…), then press N. Otherwise, anonymity/privacy/security settings deployed with Whonix might get lost. If you are an advanced user and know better, you can of course manually check the difference and merge them. Pressing Y will result in the loss of customized settings.
d) Restart and Update Whonix VMs.
To benefit from security updates, particularly kernel upgrades (linux-image-… was upgraded) which require a full reboot, the best practice is to shutdown the VMs and restart them.
In terminal:
sudo reboot
If you want to omit rebooting, use needrestart and follow instructions in this link:
[Operating System Software and Updates]
6.6 Take VM Snapshots
A good security practice is to keep a master copy of your updated, ‘clean’ Whonix-Gateway and Whonix-Workstation VMs and only use snapshots (or clones) of these VMs for anonymous activity. The master copies should not have any settings edited or additional software installed on them. Also, the ‘clean’ and ‘unclean’ VM states should not be mixed up from the start.
Users who may be targeted should regularly ‘roll back’ after risky activity and whenever the user suspects the integrity of the system may have been compromised. That is, the unclean VMs should be deleted and fresh clones created from the ‘clean’ templates for additional activities.
If this advice is ignored and the VMs are compromised, then an attacker potentially has access to all data contained therein: all credentials, browser data, passwords etc. Although the IP address is never leaked, this information is probably enough to de-anonymize most users.
Following this advice, you should now stop and not browse anywhere or open any unauthenticated communication channels to the Internet with the VMs freshly created from the previous steps. The only exception to this rule is running apt, which has a guaranteed way to securely download and verify packages. It is recommended you now:
- Shutdown the virtual machines; and
- Create snapshots of their clean state.
This process is easy in VirtualBox, using copy/paste, cloning and exporting/importing. VirtualBox’s VM Snapshort feature is not recommended, as users have experienced data loss with it (corrupted virtual hard drives). However, for users who wish to use it and experience no problems, it provides a convenient and useful feature for making snapshots of live running systems prior to the installation of new applications. Use at your own risk!
Users are instead recommended to use SubVersioN (SVN) which is a more reliable and efficient tool for making backups of VM operating environments across multiple operating systems. Before installing SVN, users should familiarize themselves with SVN and how to use it:
https://subversion.apache.org/
https://subversion.apache.org/docs/
6.7 General Advice
For a more thorough consideration of safe and unsafe user actions in Whonix, see section 8.
6.7.1 Only Use the Whonix-Workstation
All your desktop activities should take place in the Whonix-Workstation. You should never use Whonix-Gateway for anything other than running Tor on it! Also, do not install additional software in the Whonix-Gateway unless you know what you are doing.
If you ignore this advice and the Whonix-Gateway is compromised, the attacker can access your identity (public IP address) as well as all destinations, clear-text and hidden service communication.
6.7.2 Avoid Interrupting the Virtualizer
To prevent against time zone leaks, the system clock inside Whonix is set to UTC. This means the clock may be a few hours before or ahead of your host system clock. Do not change the system clock!
It is recommended users not use pause/suspend/save/resume features of virtualizers or hibernation functions on the host OS while Whonix-Workstation is running. If this advice is ignored, users should manually run TimeSync afterwards:
Start Menu → Applications → System → Time Synchronization Monitor (sdwdate-gui)
It is also recommended to not pause/suspend/save/resume the Whonix-Gateway, because it is difficult to properly restore the clock afterwards. Specifically, if your host clock (in UTC) is more than 1 hour in the past or more than 3 hours in the future, Tor can’t connect.
If this advice is ignored, the user should check the host’s battery status and fix the host clock manually (right clicking on the clock). The Whonix-Gateway can then be powered off and on again, and Tor should be able to connect. If your host clock is too inaccurate, you may experience problems in updating your host operating system.
6.7.3 VirtualBox Hardening
As many users default to VirtualBox, consider removing unnecessary features which increase the attack surface. Many features can be safely removed and do not impact core functionality:
- Disable Audio;
- Do not enable Shared Folders;
- Do not enable video acceleration;
- Do not enable 3D acceleration;
- Do not enable the Serial Port;
- Remove the Floppy drive;
- Remove the CD/DVD drive;
- Do not attach USB devices;
- Disable the USB controller (enabled by default) - this requires setting Pointing Device to “PS/2 Mouse” or changes will revert;
- Do not enable the Remote Display server;
- Do not enable IO APIC or EFI; and
- Enable PAE/NX (NX is a security feature).
6.8 Bridges for Censored Whonix Users
6.8.1 When to Use Bridges
When using Tor with Whonix in its default configuration, anyone observing the traffic of your Internet connection - your ISP, your government, law enforcement and intelligency agencies - can easily determine you are using Tor. This may be a problem if the following applies in your country:
a) Tor is blocked by censorship: since all connections to the Internet are Tor-routed, this would make Whonix useless for everything except working offline on documents etc; or
b) Using Tor is dangerous or considered suspicious: in this case starting Whonix in its default configuration might get you into serious trouble with authorities.
Tor bridges (Tor bridge relays) are alternative entry points to the Tor network that are not all listed publicly. Using a bridge makes it harder, but not impossible, for your ISP to know that you are using Tor. Before using bridges, familiarize yourself with what bridges are and how obfsproxy works. Obfsproxy is the application that Tor uses to connect bridges, see:
[Configure (Private) (Obfuscated) Tor Bridges]
Bridges are less reliable and tend to have lower performance than other entry points to the Tor network. If you live in a uncensored area, they are not necessarily more secure than entry guards.
Warning: Bridges are important tools that work in many cases but they are not an absolute protection against the technical progress that an adversary could make to identify Tor users.
6.8.2 Finding a Bridge and Suitable Protocol
When Whonix starts for the first time, it won’t automatically connect to the public Tor network. Whonix Setup Wizard, which is automatically started, will guide you.
In order to use bridges, you must know in advance the address of at least one bridge. The Tor Project distributes public bridge addresses in several ways, for example from their website and via email. The easiest way to find a list of public bridges is from The Tor Project Bridge Database.
Recommendations:
a) Only use obfuscated bridges since they are harder to identify than other bridges. The Tor Project only recommends the obfs4 protocol at the time of writing (not obfs2 or obfs3), since it defends more effectively against active probing.
b) It is better to use a private obfuscated bridge than a publicly known one. The latter have a greater likelihood of being censored since they are publicly listed. Unfortunately, since some bridge addresses can be obtained by anyone from the Tor website or by email, it is also possible for an adversary to get the same bridge information by the same means. The Tor Project has some protections against that, but they are far from being perfect.
Warning: Intelligence agencies are known to monitor emails to the Tor Project requesting bridges. That is, XKEYSCORE selection rules target and record in a database those sending email to:
bridges@bridges.torproject.org
with the line “get bridges” in the body. Notably, XKEYSCORE selection rules also include those just visiting the websites of the Tor Project and TAILS.
If you wish to use this method anyhow, then follow the directions in the following link:
c) The safest method is to find a trusted friend or organization in a different country who can run a private obfuscated bridge for you. In this case “private” means that the bridge is configured with the option PublishServerDescriptor 0. Without this option the Tor Project can learn about the bridge and may distribute its address to others and so it could end up in the hands of an adversary.
6.8.3 Configure a Bridge in Whonix
Whonix does not include a wizard to set up private or public obfuscated bridges. The graphical tor-launcher screenshots seen on the Tor Project’s website cannot be used in Whonix. Instead, bridges are configured on the Whonix-Gateway in the same way as if you were using vanilla Debian GNU/Linux (Whonix is based on Debian).
a) Access /etc/tor/torrc on the Whonix-Gateway to add bridges.
If you are using a graphical Whonix-Gateway:
Start Menu → Applications → Settings → /etc/tor/torrc
If you are using a terminal-only Whonix-Gateway:
sudo nano /etc/tor/torrc
b) Edit /etc/tor/torrc on the Whonix-Gateway and configure bridges.
Once inside /etc/tor/torrc, scroll to the very bottom and copy-paste the following text:
UseBridges 1
ClientTransportPlugin obfs2,obfs3 exec /usr/bin/obfsproxy managed
ClientTransportPlugin obfs4 exec /usr/bin/obfs4proxy managed
Now you must add the IP addresses for your bridges that your sourced from earlier steps. Copy-paste the IP addresses at the bottom of /etc/tor/torrc. Make sure to manually add the text “bridge” at the beginning of each line entry.
Below is a text example for obfs3 and obfs4 (do not copy-paste this list; these IP’s will not work). Note: your torrc file will have EITHER obfs3 or obfs4, not both at the same time.
bridge obfs3 109.195.132.77:22321 4352e58420e68f5e40bf7c74faddccd9d1349413
bridge obfs3 55.32.27.22:38123 4352e58420e68f5e40bf7c74faddccd9d1349413
bridge obfs3 192.24.131.513:62389 4352e58420e68f5e40bf7c74faddccd9d1349413
bridge obfs4 192.235.207.85:42086 0EEB10BF4B4FAF56D46E cert=oue8sYYw5wi4n3mf2WDOg iat-mode=0
bridge obfs4 34.218.26.20:43263 DD21A551767816A0C9495 cert=7qzS6KASquPvJU82Fm7qoJw iat-mode=0
bridge obfs4 161.217.177.95:10703 B3B8009D01BB7E5FDFAEC cert=4RaIqGiOytEXm6Hw iat-mode=0
Once you have completed editing /etc/tor/torrc, save and exit:
Ctrl-X → press Y → Enter
c) Enable Tor.
If you have not already enabled Tor, then do so via the whonix-setup-wizard.
If you are using a graphical Whonix-Gateway:
Start Menu → Applications → System → Whonix Setup Wizard
Select “Enable Tor” and press next
For terminal-only Whonix-Gateway:
sudo whonixsetup
Select “Enable Tor” and press next
d) Reload Tor.
After editing /etc/tor/torrc you must reload Tor so your changes take effect.
If you are using a graphical Whonix-Gateway:
Start Menu → Applications → Settings → Reload Tor
For terminal-only Whonix-Gateway (reload Tor and check Tor’s daemon status):
sudo service tor@default reload
sudo service tor@default status
It should output a message saying:
Active: active (running) since …
In case of issues, check Tor’s configuration:
sudo -u debian-tor tor --verify-config
The output should show something like:
Sep 17 17:40:41.416 [notice] Read configuration file “/etc/tor/torrc”.
Configuration was valid
Note: If you are not able to connect to Tor after completing all these steps, you have most likely done something wrong. Go back and check your /etc/tor/torrc file and redo the steps outlined in the sections above. If problems persist, refer to this link for troubleshooting:
[Configure (Private) (Obfuscated) Tor Bridges]
6.9 Further Links
Change the keyboard layout:
[Keyboard Layout]
Change the system language:
[Change the System or Tor Browser Language]